
With the new iCloud Shared Photo Library available in iOS 16, iPadOS 16, and macOS Ventura, Apple makes it a lot easier to share your photos from your devices. Essentially, a shared photo library is a library in the Photos app that you and others can add, remove, and edit together. It requires some setup and there are some limitations, but it gets us a lot closer to the “it just works” ideal that we all want.
Before we get into the instructions, let’s cover the requirements and restrictions of the service. Related : How to record a WhatsApp call on iPhone
iCloud Shared Photo Library: Requirements and restrictions
With iCloud Shared Photo Library, you can share all or part of your personal photo library in the Photos app. Photos in the Shared Photo Library are accessible to anyone who has been granted access. Here are the key points you need to know.
What versions of iOS, iPadOS, and macOS are required? All users (the person sharing the library and the people granted access) must be using a Mac running macOS Ventura, an iPhone with iOS 16, and an iPad with iPadOS 16.1.
During setup, Photos will poll the devices linked to your Apple ID and tell you which devices need to be updated. Devices running older operating systems will not have access.
Is iCloud required? As its name implies, iCloud is needed to use iCloud Shared Photo Library.
How much iCloud storage is needed? As much as you can afford. These shared photos are saved to iCloud, so the more photos you want to share, the more storage you will need, especially if you don’t want to deal with managing the photos.
Who can access the iCloud Shared Photo Library? Up to five invited people using an iPhone, iPad, or Mac with the latest operating systems.
What can people do in an iCloud Shared Photo Library? The people who are granted access can add, edit, and delete photos.
Can I select which photos to share? Yes, and you can also unshare photos after they’ve already been shared.
How many share libraries can I access at once? One. That’s it. If you want to join a different library, you need to either delete the shared library if you are hosting one, or leave the one you joined.
How to set up iCloud Shared Photo Library in macOS Ventura
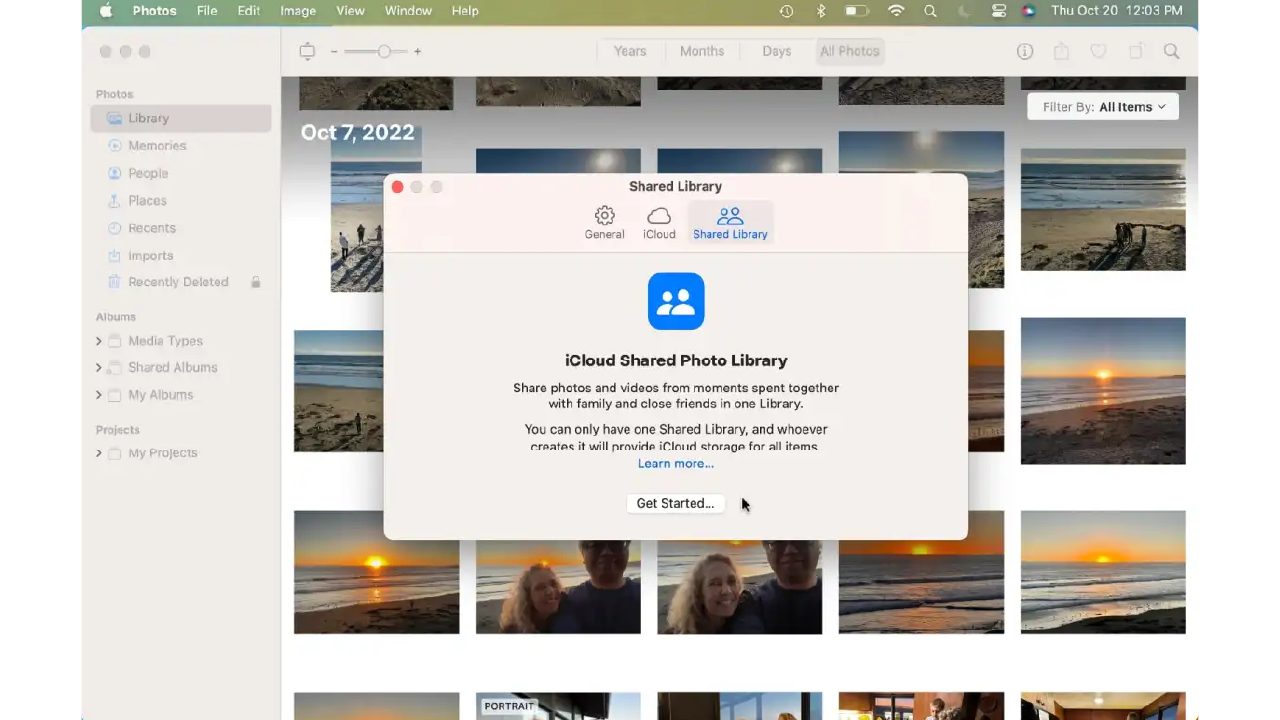
1. Shared Library in the Photo settings
In macOS Ventura, launch the Photos app and then click on Photos > Settings in the menubar. In the window that appears, click on the third tab labeled, Shared Library. In iOS 16 and iPadOS 16, tap Shared Library in the Photos settings.
You can click on the Learn more link if you want more information about iCloud Shared Photo Library. The Get Started button may appear dimmed and inactive for a few seconds. Click it once it becomes available.
2. Before you get started
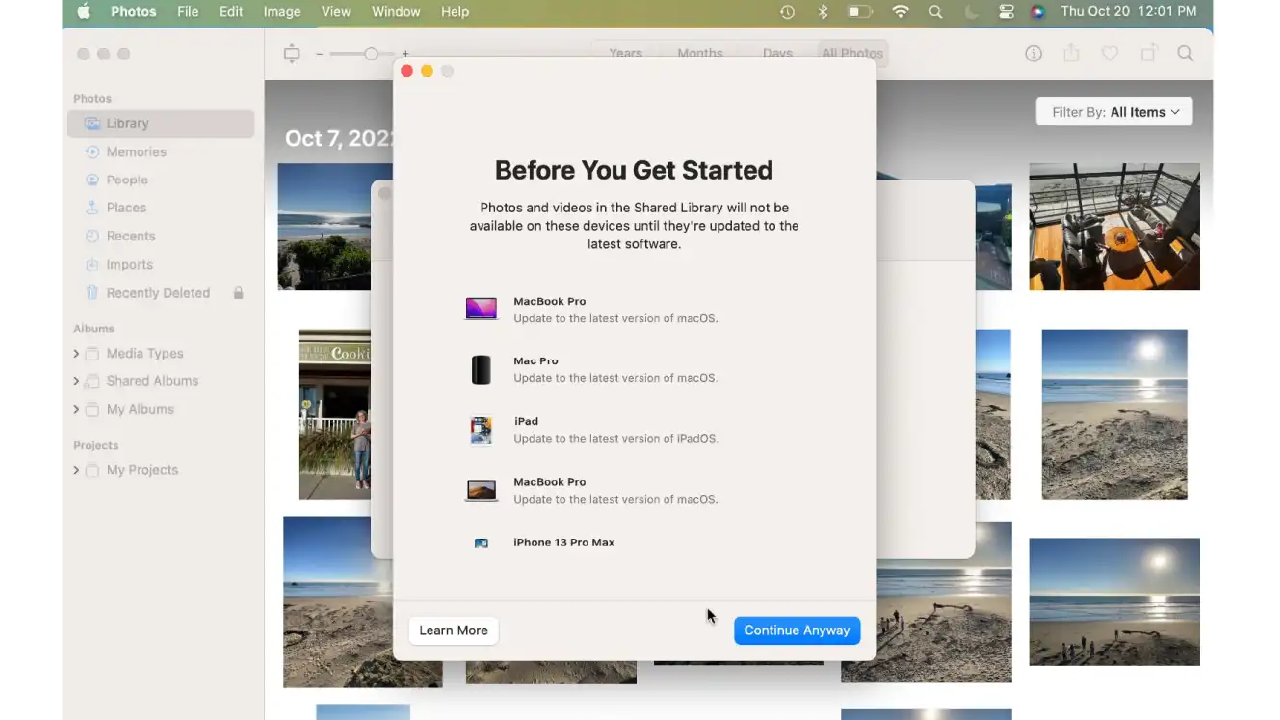
After clicking the Get Started button, Photos on your Mac will scan the devices linked to your Apple ID and tell you if any devices need to be updated. Incompatible devices running older operating systems will not have access. Click Continue Anyway to proceed.
3. Add participants
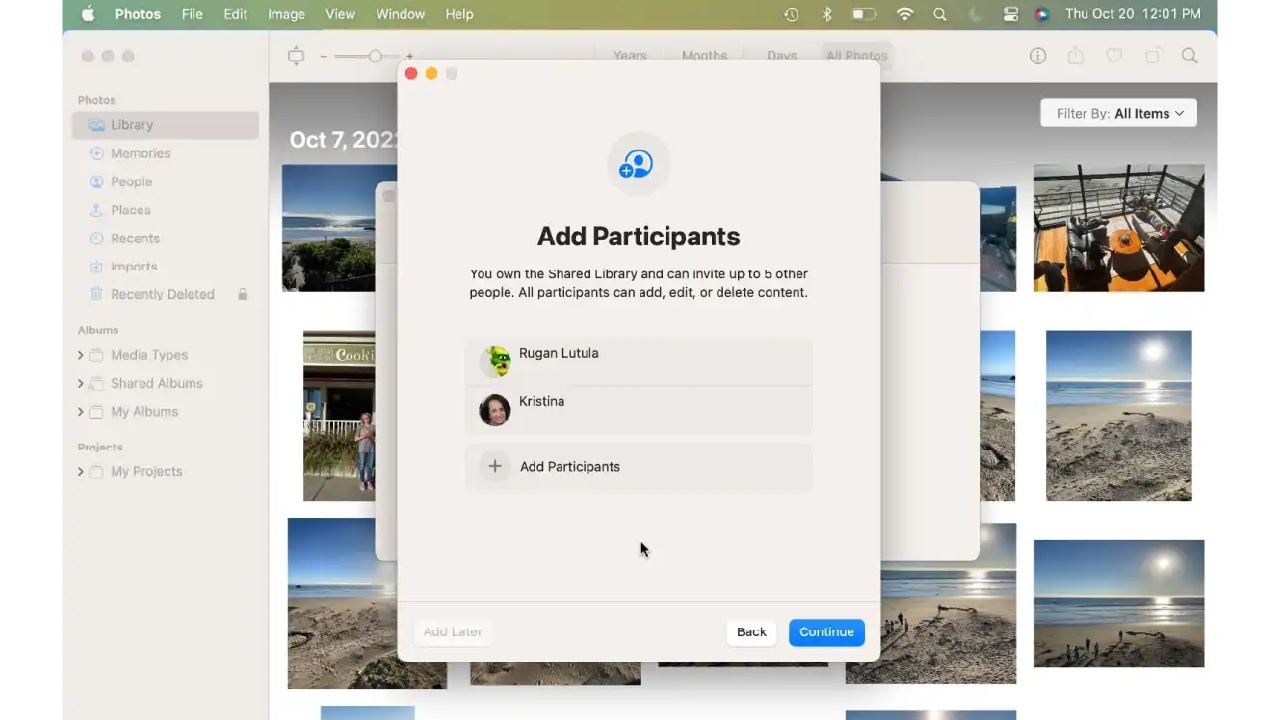
It’s time to add the people who should have access to the Shared Photo Library. In the Add Participants window, click on Add Participants slot to add up to five people from your Contacts. Click Continue when you’re done.
4. Move photos to the shared library
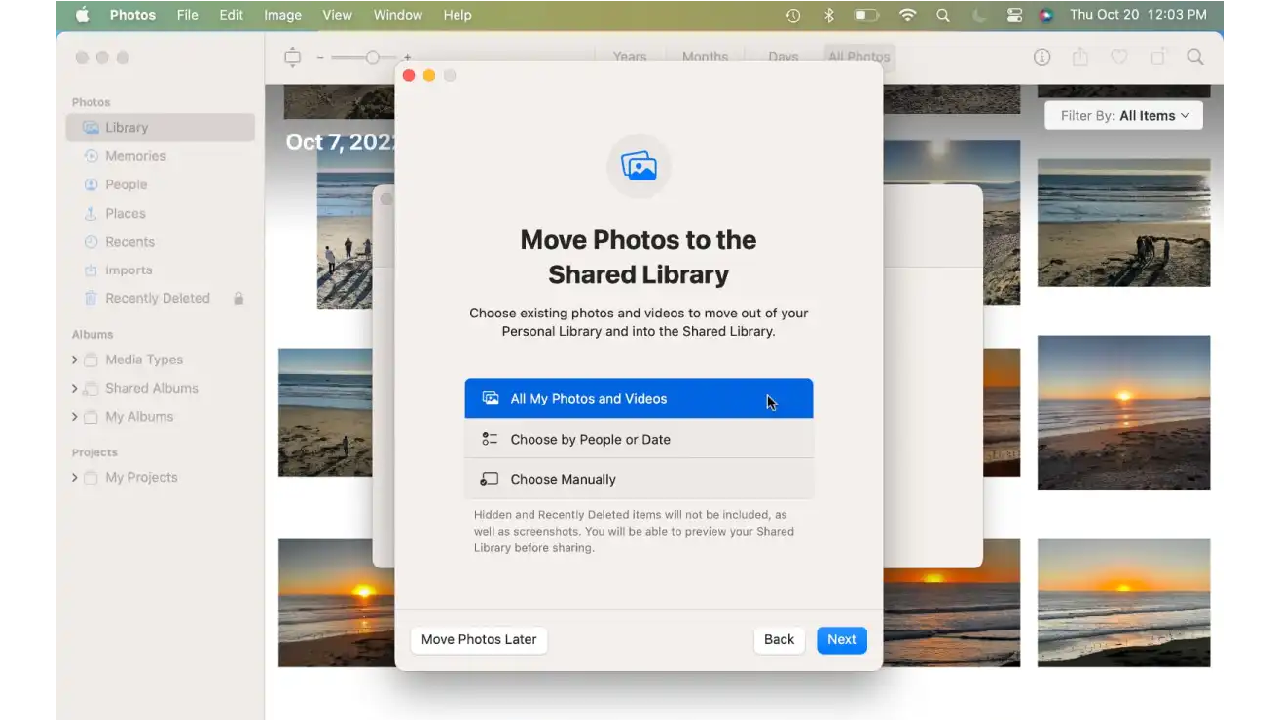
Now you need to create the shared library. Apple gives you three options for how you want to choose the shared photos (hidden or recently deleted photos are not included):
- All My Photos and Videos: Everything in your personal library will be moved to the shared library.
- Choose by People or Date: The app filters the photos based on these criteria.
- Choose Manually: You can hand-pick the photos.
You can choose Move Photos Later if you need to give the options more thought or want to start with an empty library. Otherwise, make a selection and then click Next. (All My Photos and Videos was selected for the rest of these instructions.)
On iPhones and iPads, you’ll also see an option to Share from Camera, which lets you automatically add photos and videos to your shared library with the Library button in the Camera app. Additionally, you can opt to automatically share with participants over Bluetooth when they’re within range.
5. Preview the library before sharing
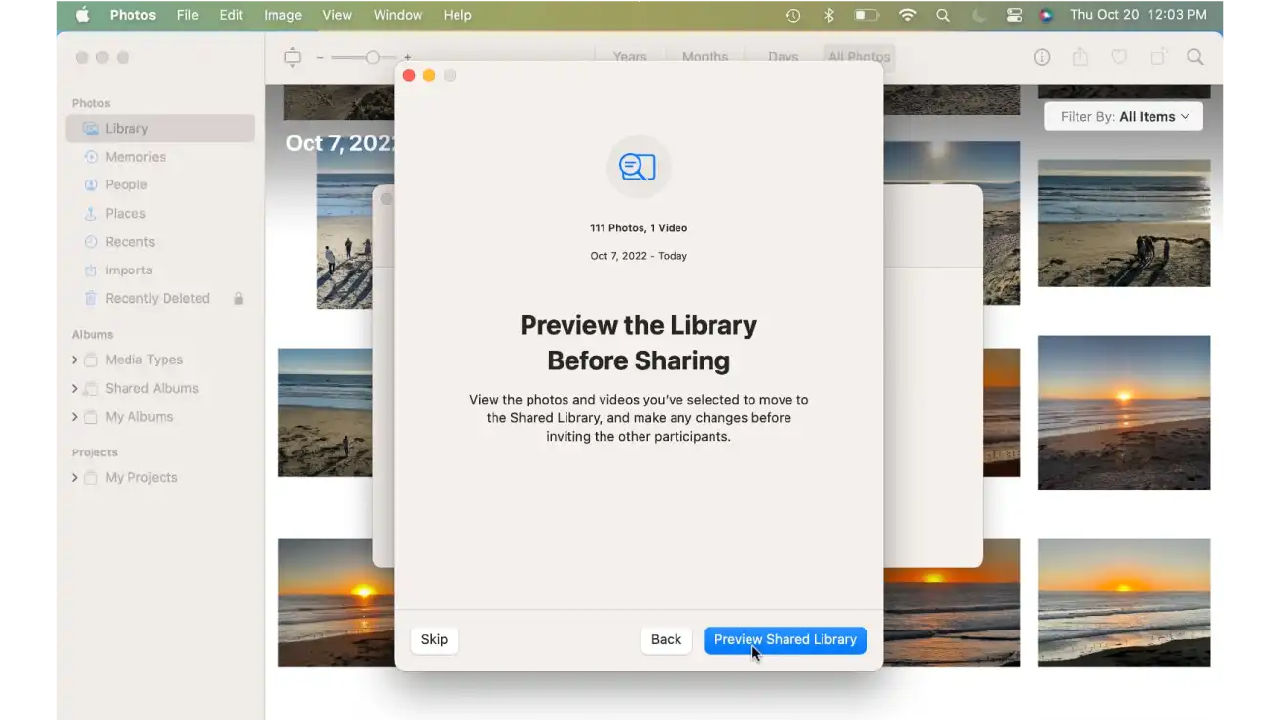
Here’s a helpful step–you get to see what the shared library looks like before the other users are given access. At the top of the window, you’ll see how many photos and videos will be in the library and the dates that will be covered.
You can click the Skip button if you want to forego the preview, and if you do that go to step 7 of these instructions. Otherwise, click Preview.
6. Previewing the shared library
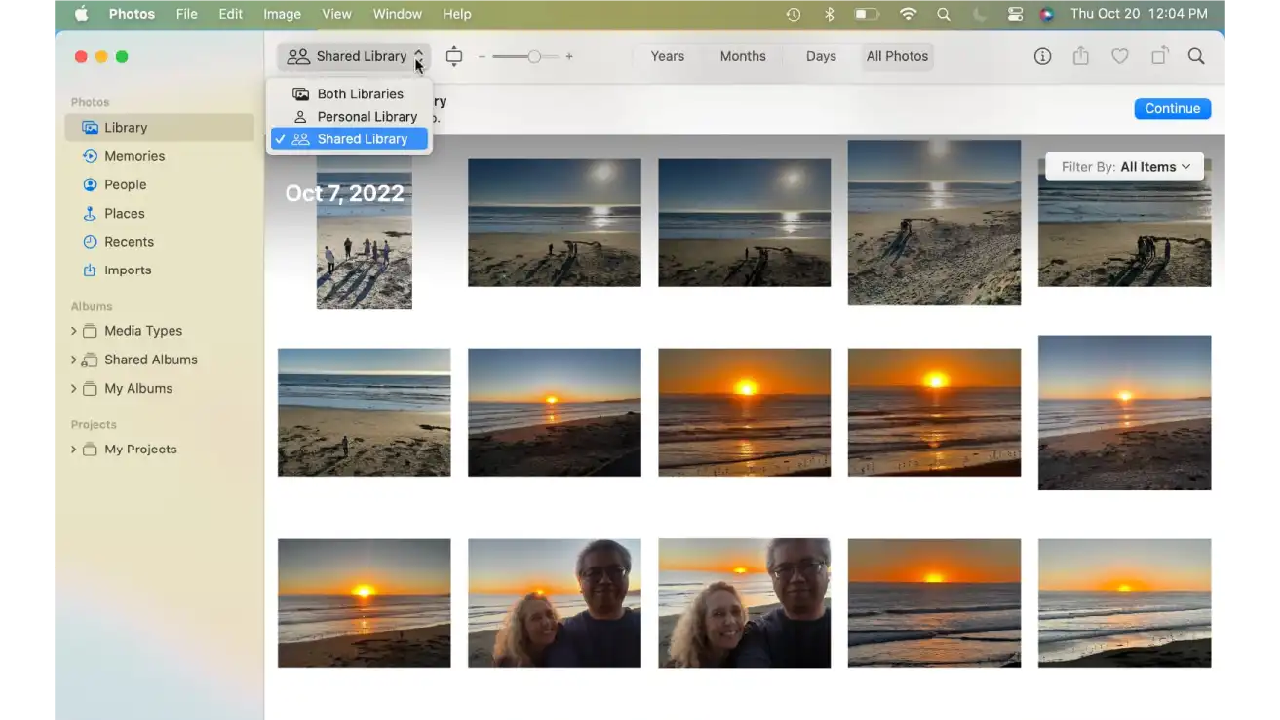
Photos will create the shared library, which could take several minutes, depending on the number of items you have.
You can scroll through the shared library to see what’s in it. The Photos app also has a helpful popup menu in the top left of the control bar to help you see your items. Click the menu and you’ll have three options:
- Both Libraries: items that are in both your personal and shared library. Shared items have a people icon in the upper right of the thumbnail.
- Personal Library: items that are not being shared. If you are sharing your entire library, this section will be empty.
- Shared Library: only items being shared.
Under the top control bar is an alert for “Previewing the Shared Library” to inform you that the shared library is not yet set up. Click Continue on the right side of this alert to proceed.
7. Invite to the shared library
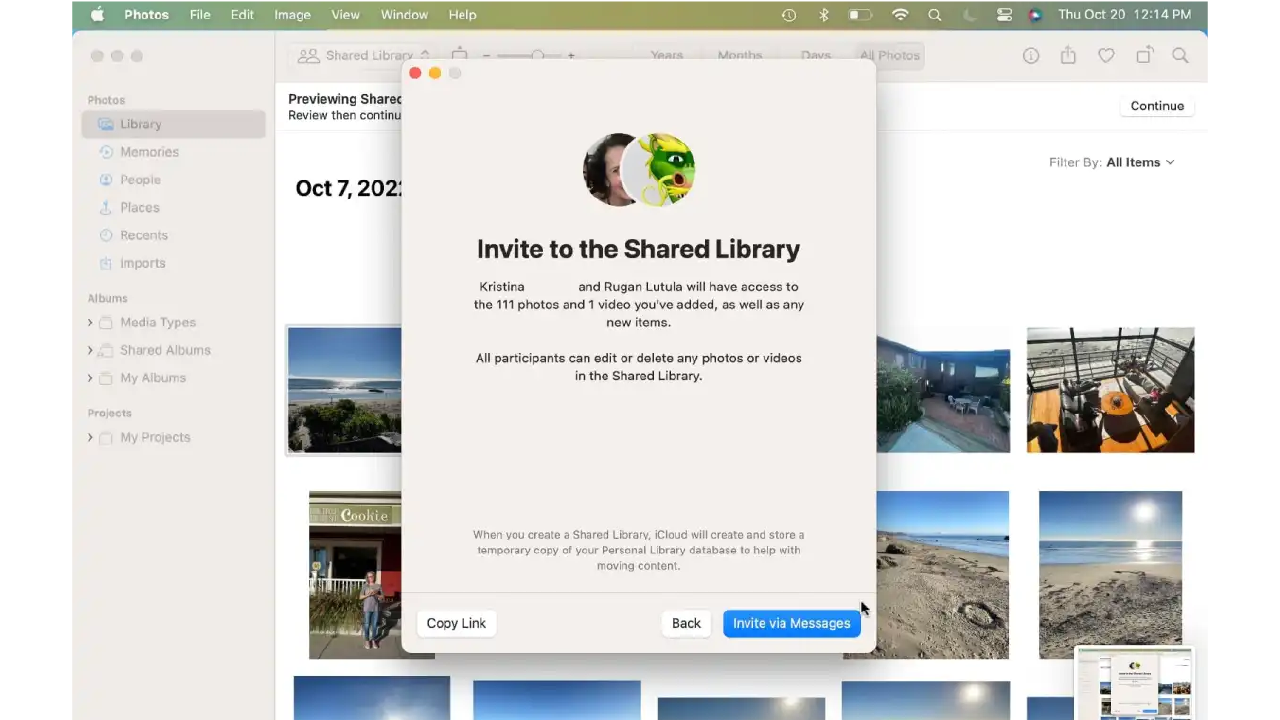
To invite people to the shared library, you can click on the Invite via Messages button, and that person will get a link to join via instant message. If the person you want to invite isn’t reachable via Messages, you can click the Copy Link button and the link will be copied to your clipboard for pasting into an email or other document.
However, these choices are all or nothing–you can’t Message some invites and use Copy Link to email others. If you click Invite via Messages and an invitee is not reachable via Messages, you’ll get a “Message Failed to Send” notification. If you click either button, you’ll move to the next step.
We’ll cover how to invite people after the shared library has been set up or how to resend an invite later in this tutorial.
8. Your shared library is ready
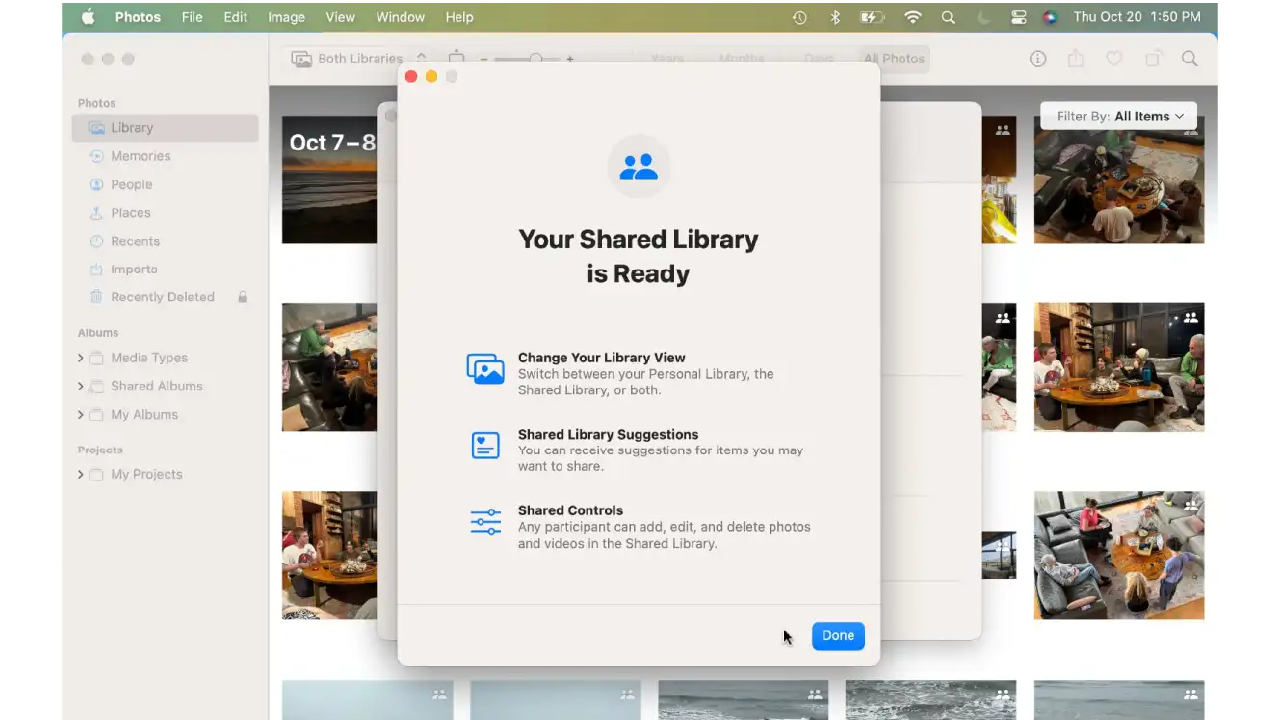
Your library is all set up. Click the Done button to exit the setup.
Additional iCloud Shared Photo Library settings
After the iCloud Shared Photo Library is set up, you can adjust its settings. Go to Photos > Settings > Shared Library on your Mac or Settings > Photos on your iPhone or Mac to adjust the following:
- Participants: You can add or remove participants. The limit is five. You can also resend an invitation, but it defaults to sending the link via Messages. A Messages window will appear, so you can copy the link for sending through another means.
- Shared Library Suggestions: The Photos app uses AI to suggest photos and videos of people that you may want to add to the shared library.
- Deletion Notifications: You can choose to receive alerts when people delete items.
- Sharing from Camera: You can turn this setting off on your iPhone or iPad.
- Delete Shared Library: End the shared library. You have the option to keep everything or keep only the items you contributed. These items will be moved into your personal library.
Related : How to Share Photos Between iPhone, iPad, and Mac With a Quick Gesture